
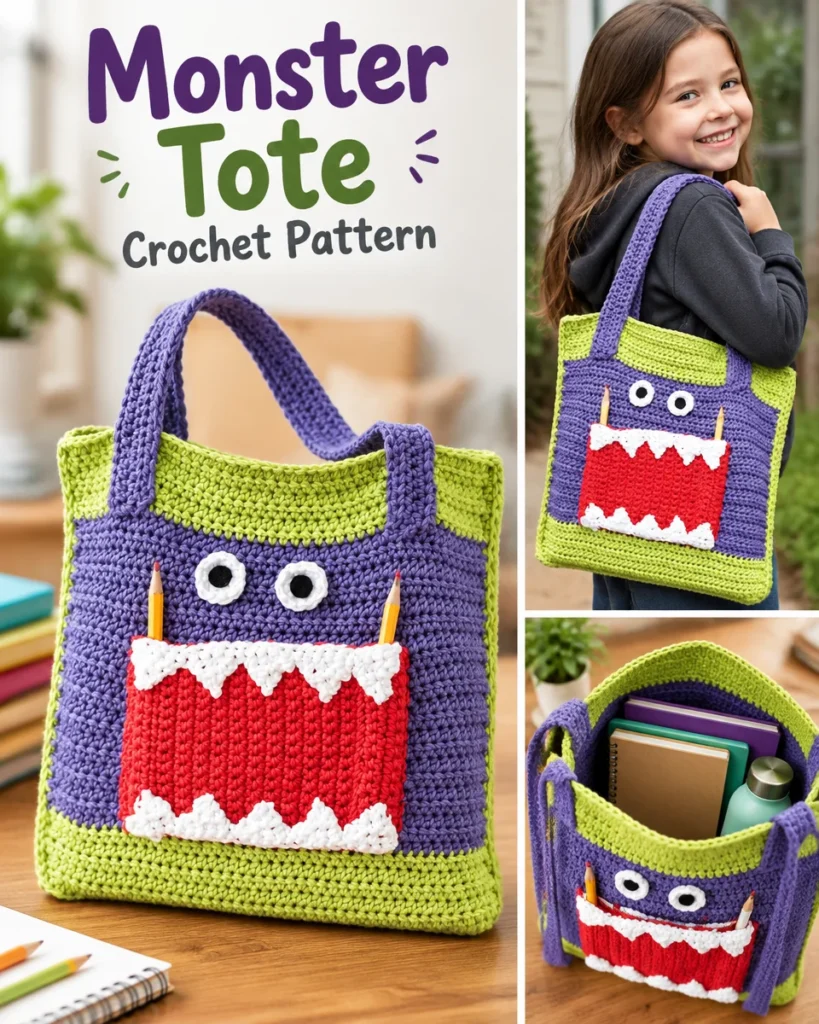
Crocheting has always been a delightful way for me to express creativity, whether it’s making gifts for friends or creating functional items for my home. Recently, I tried my hand at the adorable ‘Monster Ate My Homework’ Tote Pattern, and I must say, it’s a fantastic project for both novice and seasoned crocheters alike! This whimsical tote not only serves as a practical carry-all for school supplies or groceries but also adds a playful touch to your outfit. If you’re looking for a fun crochet challenge that results in something both useful and charming, this pattern is the perfect fit.
Why you’ll love this pattern
This project is packed with benefits that make it an enjoyable experience for all. Here’s what makes it special:
- Beginner Friendly: The pattern includes basic stitches, making it accessible for those new to crocheting.
- Skill-Building Value: While it’s easy for beginners, it also offers enough complexity to help improve your skills.
- Quick Completion: Many crocheters find that they can complete this project in a short amount of time, allowing for instant gratification.
- Handmade Appeal: The whimsical monster design adds a unique and personal touch, perfect for gifting.
- Practical Use: This tote is great for carrying everything from books to beach gear, making it a versatile addition to your accessory collection.
"I made the Monster Ate My Homework Tote for my daughter’s school supplies, and she absolutely loves it! It’s a fun project that was easy to follow." – A happy crocheter.
How this crochet pattern comes together
In this project, you’ll be creating a large crochet tote shaped like a friendly monster. The pattern includes a fun pocket for pencils, giving it character while still having an entirely functional design.
The project mainly uses half double crochet and single crochet stitches. With some experience, you’ll find this pattern easy to navigate, and you should be able to finish it within a weekend!
Materials you’ll need
Gather the following materials before you start:
- Lily® Sugar’n Cream® (70.9 g / 2.5 oz; 109 m / 120 yds)
- Contrast A Hot Green (01712): 105 m / 116 yds or 1 ball
- Contrast B Grape (00071): 250 m / 276 yds or 3 balls
- Contrast C Red (00095): 52 m / 57 yds or 1 ball
- Contrast D White (00001): 38 m / 42 yds or 1 ball
- Crochet hook: Size 4 mm (U.S. G or 6), or size needed to obtain gauge
- Small piece of black felt for eyes
- Craft glue
When selecting yarn, keep in mind that Lily® Sugar’n Cream® is a cotton yarn, perfect for both durability and ease of maintenance. Make sure your hook size matches the yarn weight for a consistent tension throughout your piece.
Step-by-step instructions
BAG (Make 2 pieces alike)
- With A, ch 47.
- 1st Row: 1 hdc in 3rd ch from hook. 1 hdc in each ch to end of the chain. Turn. (45 hdc)
- 2nd Row: Ch 2. 1 hdc in each hdc to end of row. Turn.
- Repeat the last row until the work measures 2" [5 cm]. Join B.
- With B, repeat the 2nd row until work measures 10" [25.5 cm]. Join A.
- With A, repeat the 2nd row until work measures 12" [30.5 cm]. Fasten off.
MOUTH POCKET
- With C, ch 18.
- 1st Row: (RS) 1 sc in 2nd ch from hook. 1 sc in each ch to end of chain. Turn. (17 sc)
- 2nd to 4th Rows: Ch 1. 1 sc in each sc to end of row. Turn.
- 5th Row (Folding Row): Ch 1. Working in back loops only, 1 sc in each sc to end of row. Turn. Place a marker at the end.
- 6th to 8th Rows: Ch 1. Working in both loops, 1 sc in each sc to end of row. Turn.
- 9th Row: Ch 1. Fold work along 5th row. Working through both thicknesses, 1 sc in each sc to end. Turn. (First pencil pocket made.)
- 10th Row: Ch 1. 1 sc in each sc to end of row. Turn.
- Repeat last row until work from marked row measures 5½" [14 cm], ending on a WS row.
- Next Row: (RS) Ch 1. Working in front loops only, 1 sc in each sc to end. Turn. Place a marker at the end.
- Next 3 Rows: Ch 1. Working through both loops, 1 sc in each sc to end. Turn.
- Next Row: (RS) Ch 1. Folding row. Working in back loops only, 1 sc in each sc to end. Turn.
- Next 3 Rows: Ch 1. 1 sc in each sc to end. Turn. Fasten off, then fold along the last Folding row worked. Sew the edge to remaining loops of the marked row (second pencil pocket made).
TEETH (Make 2)
- With D, ch 26.
- 1st Row: 1 sc in 2nd ch from hook. 1 sc in each ch to end. Turn. (25 sc)
- First Tooth:
- 1st Row: Ch 1. Sc2tog. 1 sc in next sc. Sc2tog. Turn. Leave remaining stitches unworked.
- 2nd Row: Ch 1. 1 sc in first st. Sc2tog. Turn.
- 3rd Row: Ch 1. Sc2tog. Fasten off.
- Second Tooth: Join D with sl st to next unworked sc. Repeat the steps from the First Tooth.
- Third to Fifth Teeth: Repeat the steps to make 3 more teeth. (5 teeth made.)
(Sew Teeth to Mouth Pocket, making sure not to close the pencil pockets.)
EYES
- With D, ch 2.
- 1st Round: 6 sc in 2nd ch from hook. Join with sl st to first sc.
- 2nd Round: Ch 1. 2 sc in each sc around. Join with sl st to first sc. (12 sc). Fasten off.
HANDLES (Make 2)
- With B, ch 69.
- 1st Row: 1 hdc in 3rd ch from hook. 1 hdc in each ch to end of chain. Turn. (67 hdc)
- 2nd Row: Ch 2. 1 hdc in each hdc to end. Turn.
- Repeat the last row 4 more times.
- Fold work in half lengthwise. Working through both thicknesses, 1 sc in each hdc and remaining loop of foundation ch to end. Fasten off.
FINISHING
- With WS of Bag pieces together, join A with sl st to the top left corner.
- Ch 1. Working through both thicknesses, work 1 round of sc evenly around side edges and bottom, including 3 sc in each bottom corner. Fasten off.
- Sew Mouth Pocket onto the front of the Bag, leaving the top edge open.
- Cut black circles from felt for Eyes, approximately 1/2" [1.5 cm]. Glue black felt circles to the centers of Eyes and sew them onto the Front of Bag.
- Attach Handles as shown in the picture.
Ways to use your finished project
Once you’ve completed the ‘Monster Ate My Homework’ Tote, the possibilities for use are endless! Here are a few ideas:
- School Bag: Perfect for kids to carry their books and supplies.
- Grocery Tote: Use it for eco-friendly shopping.
- Craft Carrier: Ideal for transporting your current crochet project, keeping your materials organized.
- Beach Bag: Great for holding beach towels and sunscreen!
- Gift Bag: An awesome idea for combining practicality with a personal touch.
How to care for your crochet project
Proper care will keep your tote looking fresh and vibrant:
- Hand Wash: Always hand wash your cotton items in cold water to maintain shape and color.
- Flat Dry: Lay it flat to dry rather than hanging to prevent stretching.
- Avoid Bleach: Because of the color, avoid bleach products that might harm the yarn.
- Gentle Handling: Be cautious about pulling on stitches when using the tote, as this can lead to stretching.
Helpful crochet tips
- Maintain Even Tension: Pay attention to your tension for uniform stitches.
- Count Stitches: Keeping track of your stitches ensures your project stays on track.
- Use Stitch Markers: They are helpful for marking your rows or sections, especially when working on bigger pieces.
- Check Gauge: Always check your gauge to ensure the finished project matches the intended size.
- Secure Ends: Weave in all loose ends to finish your tote properly and prevent unraveling.
Creative variations
Feel free to personalize your ‘Monster Ate My Homework’ Tote:
- Color Combinations: Choose different shades for each contrast color to match your style.
- Modified Size: Adjust the number of chains in the beginning to create a smaller or larger tote.
- Decorative Elements: Add appliqués or fun embellishments to give it a unique flair.
- Textured Yarn: Experiment with boucle or textured yarn for a different look.
Remember, any modifications might affect finished size or drape, so be prepared for some fun experimentation!
Frequently asked questions
Is this crochet pattern beginner-friendly?
Yes, the pattern uses basic stitches, making it accessible for beginners.
What yarn works best?
Lily® Sugar’n Cream® is recommended for its durability and ease of care.
Can I use a different hook size?
You may, but be mindful that it could change the size and drape of your tote.
How long does the project take?
Completion time varies, but it should take a weekend to finish.
How can I make it larger or smaller?
Adjust the starting chain width or row counts to change the size according to your preference.
With these insights, you’re well-prepared to dive into the ‘Monster Ate My Homework’ Tote Pattern. Enjoy every stitch!